


Table of contents:
A common story among marketing teams and creators: You pour hours of work into planning your webinar, but barely half of the registered attendees show up.
Is this a failure?
Only if you want it to be.
A webinar should be so much more than a one-time event. It can become the foundation for a growth engine—social media posts, podcasts, blog articles, email campaigns, and more.
The blocker?
It’s just so darn difficult and time-intensive.
You’re hosting and recording on one platform. Then you’re downloading the video and audio (in separate tracks, if you’re lucky) and uploading them to an editing tool—another software you’re paying extra for.
Are you a pro editor? If not, you’re probably paying one to cut, trim, and polish your webinar recording.
Are you a social media wiz? If not, you’ll probably pay one to make content and clips out of your recording.
Before you know it, it’s been a month since the webinar, and everyone has forgotten about it.
Webinar creation and promotion shouldn’t be a grind. That’s why we built an all-in-one webinar solution within Riverside—one platform for hosting, recording, editing, and repurposing webinars in studio quality.
In this guide, we’ll walk you through the entire step-by-step process.
If you’d rather watch a video to learn how to run webinars on Riverside, here’s our video tutorial:
How to plan, record, and repurpose a webinar step-by-step
Now, let’s get into the technical stuff, shall we?
Whether hosting live or recording, Riverside makes planning, recording, and repurposing your webinar a breeze.
We’re going to show you how:
Planning your webinar
What comes before you go live is as important as what comes after.
Riverside helps you schedule your event, invite people to join you, gauge interest, collect your attendee data, and much more.
Step 1: Schedule your webinar
Once you’ve decided on a date and time, you can schedule your webinar in just a few clicks.
From your Riverside Dashboard, click on “Plan” then “Schedule session.”
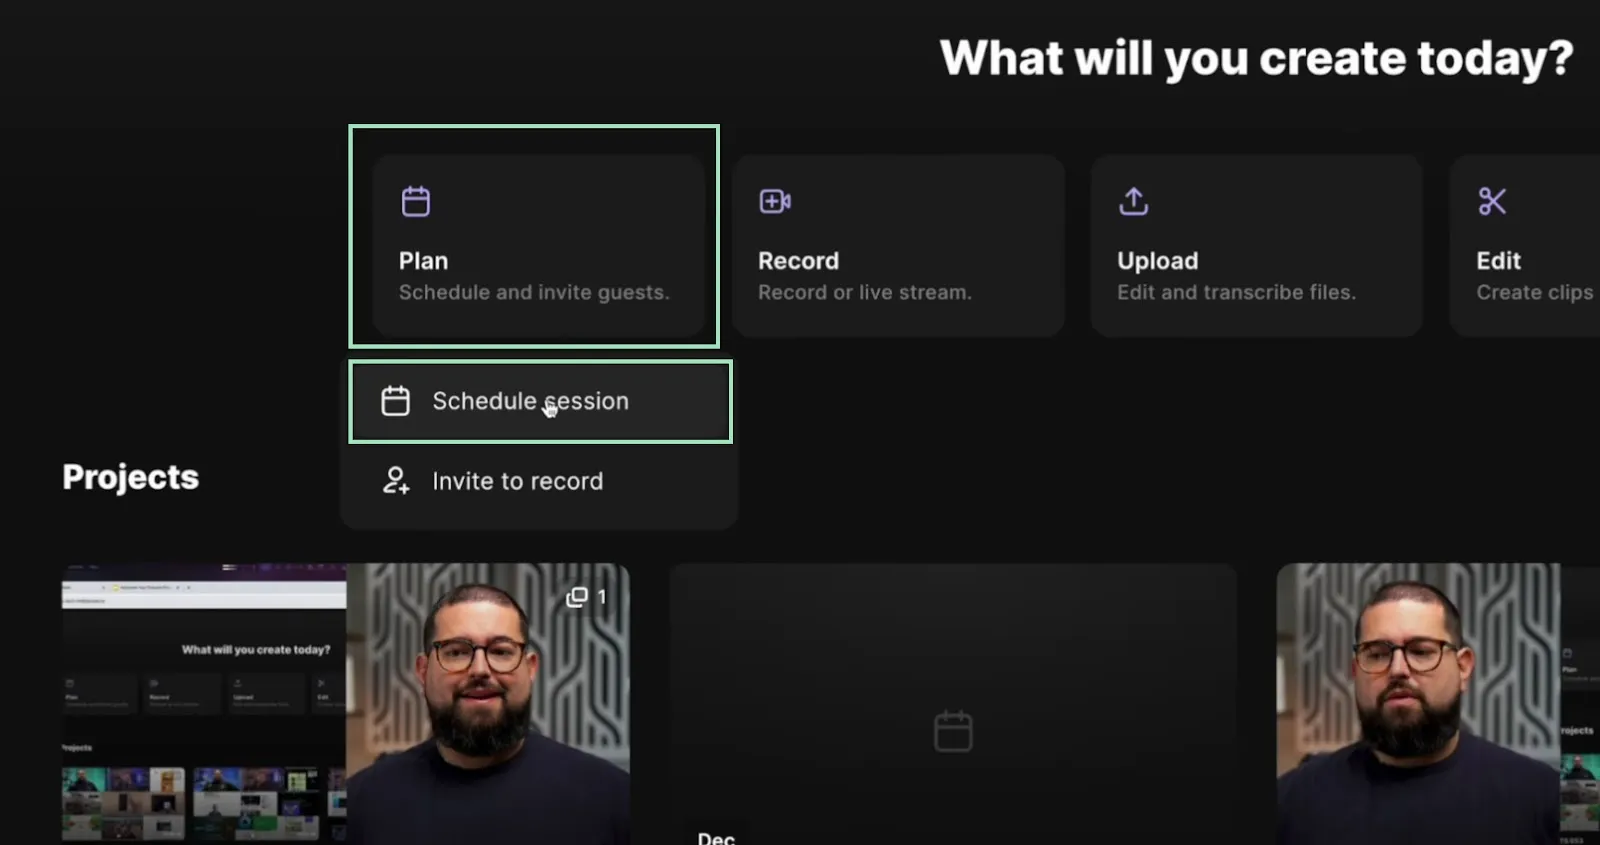
Fill in all the details (webinar name, date, time, and time zone) and start inviting people to join.

Step 2: Invite guests, producers, and audience members
Invite the people who will be joining the conversation (Guest), team members who will help you run the webinar from behind the scenes (Producer), and your attendees (Audience).

Riverside is also a formidable lead capture tool you can use to collect personal data from your attendees.
Enable the “Audience registration” toggle to create custom fields for your attendees to fill out upon registration.

Each field you create is fully customizable, so you can decide which ones are required or optional to complete upon registration.

Once you’ve previewed, confirmed, and created your registration page, you can add this invite to your Google Calendar or click the “Copy registration link” button to share your invitation on social media or via email.

Don’t worry—you don’t have to invite everyone right away. You can send more invites at any time before the event.
Just go back to your Dashboard, click “Plan,” and click “Invite to record.”

A menu will appear, allowing you to send more Guest, Producer, and Audience invites via email or by copying the invitation link.

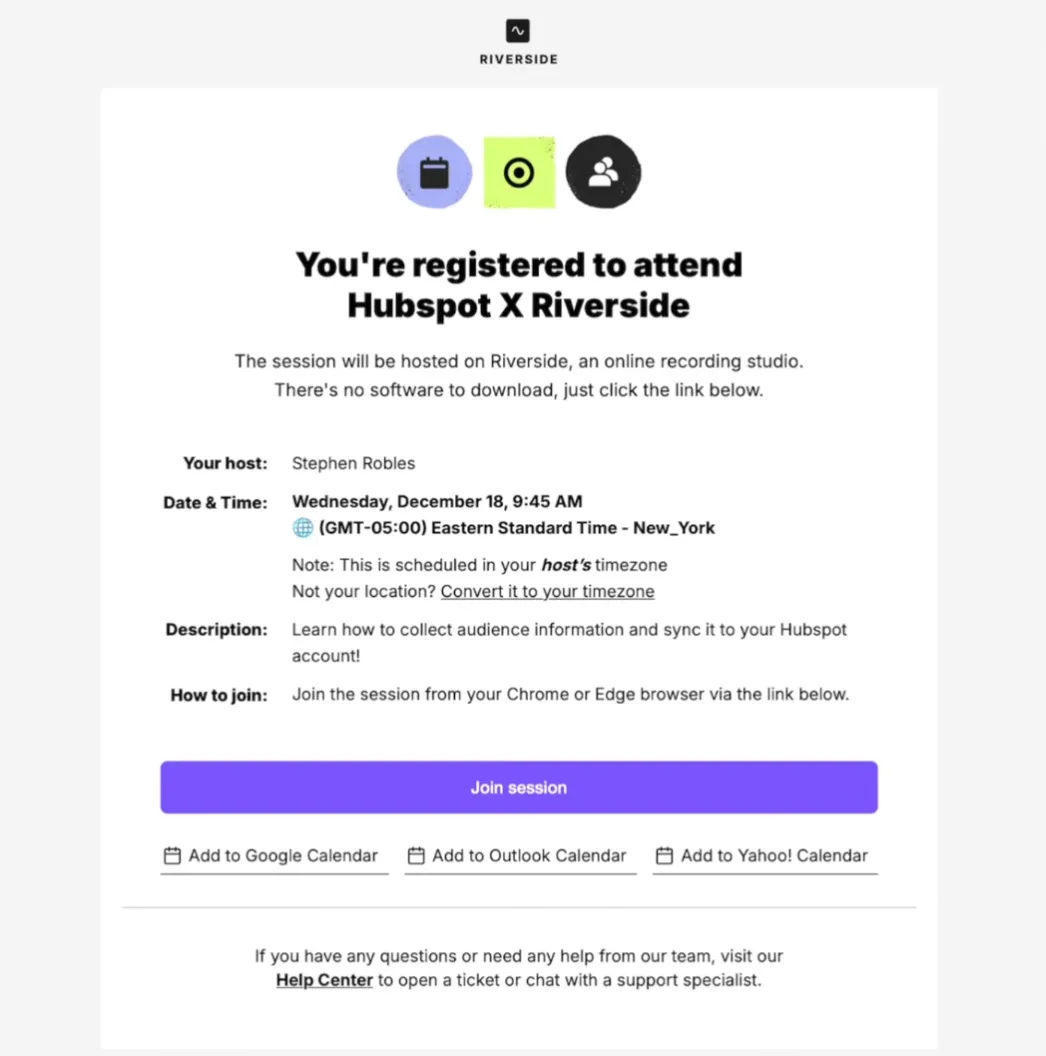
Everyone invited to your webinar will receive a reminder email with the date and time, which they can easily convert to their timezone.
They will also find a button to join the webinar quickly and clickable links to add the event to their Google, Outlook, оr Yahoo! Calendar.
Step 3: Sync registration data to HubSpot
Whenever someone registers for your webinar, you collect valuable personal information. And if you use HubSpot for marketing automation, you can easily sync this data directly from Riverside.
You can automatically create lists per webinar and registrant status and use them to develop contacts in HubSpot. You can also sync your custom form fields as contact properties into HubSpot and use the information from Riverside in your workflow.
Return to the event page to see the number of registrants (displayed on the right). You can access the list by clicking on the people icon.

Click on “Download” to save the list in .CSV format or “Sync to HubSpot” to sync it to your HubSpot account.

Setting up and customizing your Riverside Studio
Your studio has many customization options to make your webinar look great and on-brand.
Make sure to log into your Studio to set it up ahead of the session. Here’s how.
Step 1: Set up your studio
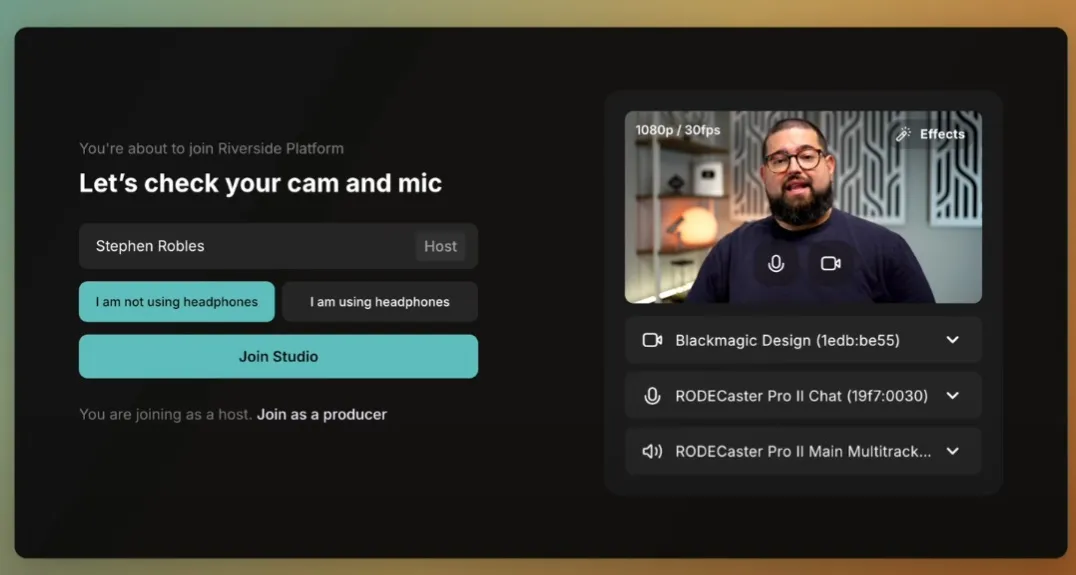
Head to your session and click the “Record” button or anywhere on the preview banner to launch your lobby.

Test your technology to make sure everything’s humming. Select your microphone, webcam, speaker output, and whether you’re using headphones.
If you’re not using headphones, Riverside automatically turns on echo cancellation.
Once you’ve checked your audio and video settings are right, click “Join Studio.”
Step 2: Brand your studio
Time to tackle branding. Click the “Brand” icon on the right sidebar to open your branding options.
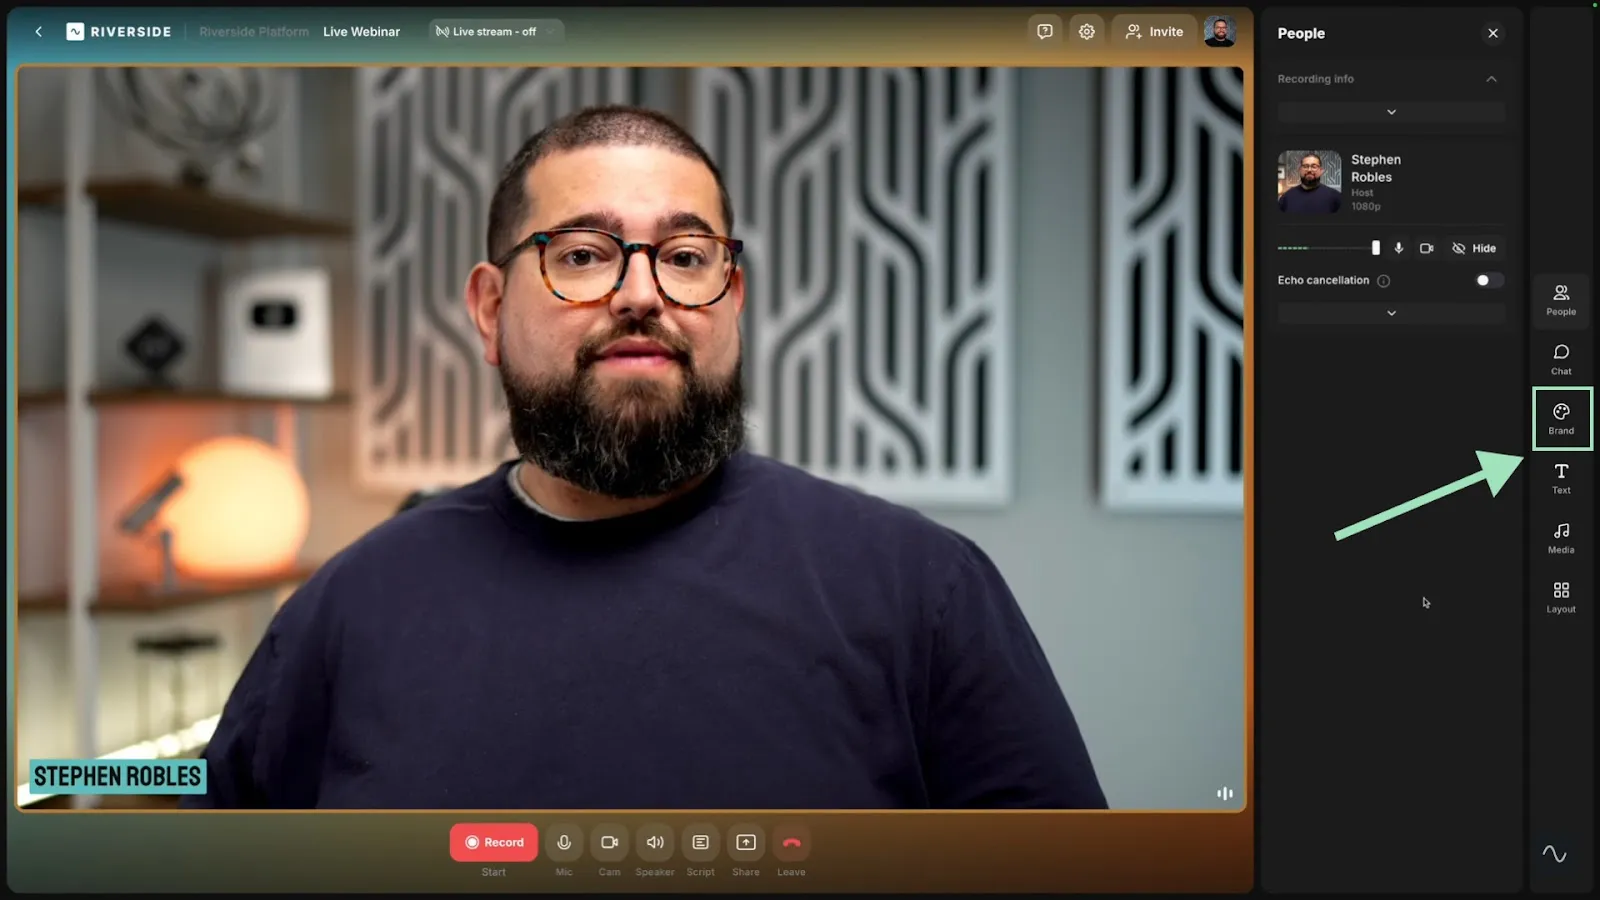
You can add a company logo and select where it appears by choosing the “Placement” options.
You can also choose a Theme from a series of presets or create a custom one with your unique brand color and background.
From this menu, you can also change the font and style of the names that appear on screen while you and your guests present the webinar.

To make further edits, click directly on the name to see various color, size, and style options. You can also add a title to appear under each name during the webinar.

By toggling “Brand the lobby,” you can apply the same scheme to the studio lobby for all your participants to see before the webinar kicks off.
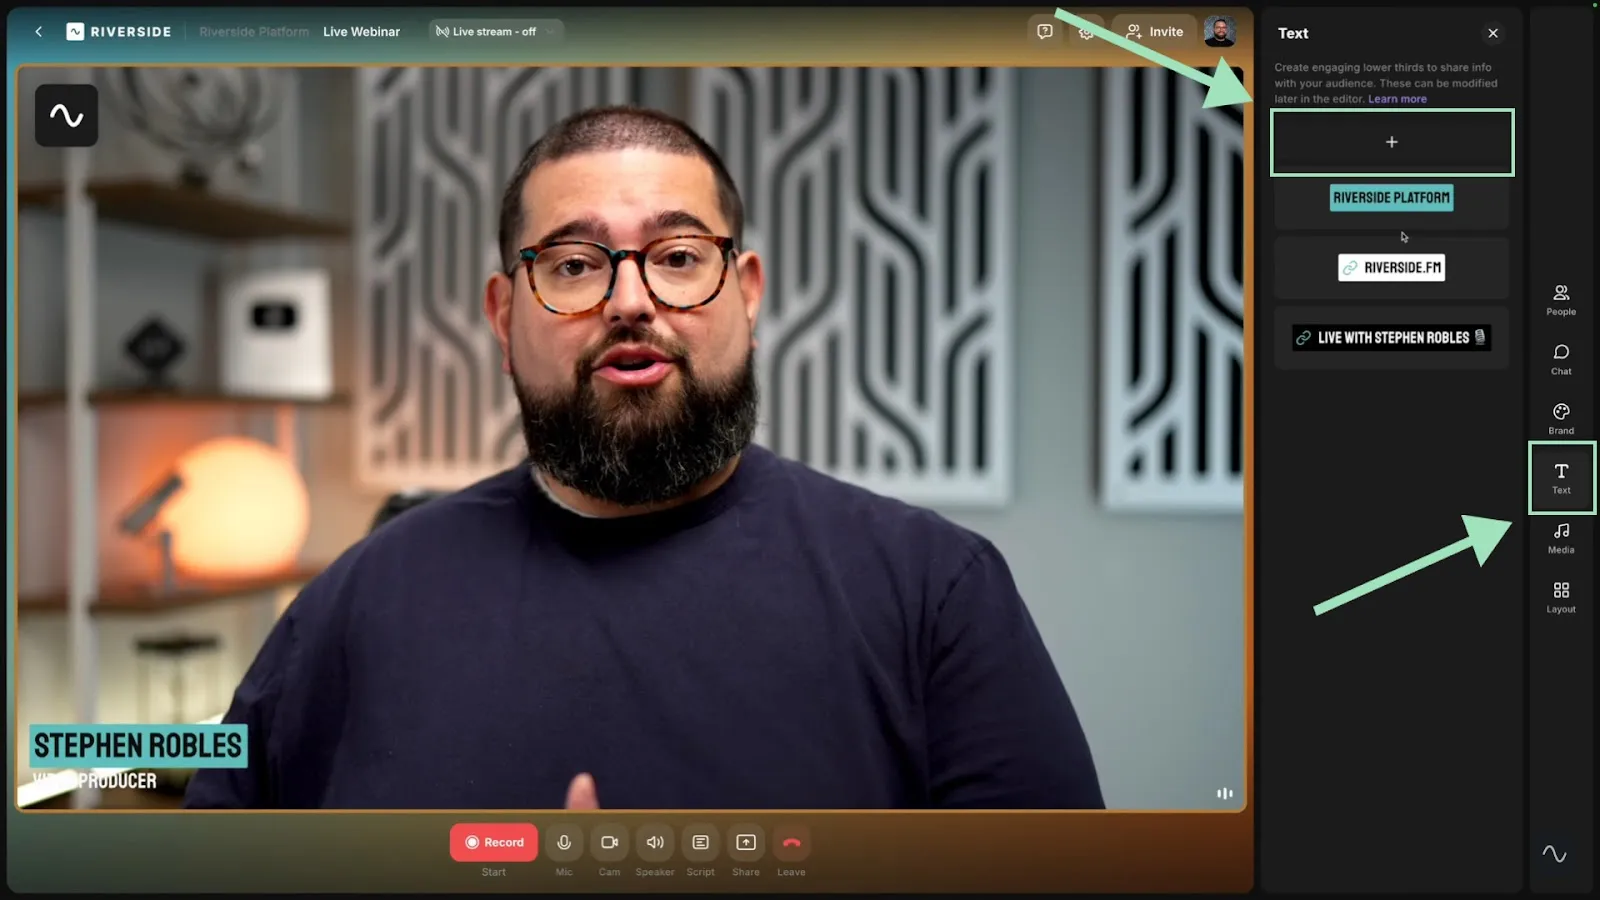
Step 3: Create lower thirds
Lower thirds are small text overlays that appear at the bottom of a video. They usually show names, titles, or other key information, such as website addresses or social media handles.
With Riverside, you can prepare them ahead of the webinar session, so you have one less thing to think about while recording.
You can then turn them on or off during your webinar at any given time.
Click on the “Text” icon on the right sidebar, then on the plus “+” icon to add a new lower third.
Type the text you want to show. If you want it to be a clickable link, press the chain icon and select “Add link.”
You can change style, color, and placement by clicking “Customize.”
You can manually show and hide your lower third or use the “Timer” option to set how long the text will remain on screen before disappearing. You can change the Timer settings any time before or during the session.

Once your lower third is saved, it’s ready to go. When recording your webinar, you can just hover over it and click “Show” to make it appear.

Step 4: Add media (slides, music, images, videos) to your studio
Let’s add more visual and audio aids to keep your webinar dynamic and entertaining. Riverside makes it easy to add just about any type of media to your webinar such as:
- Slide decks
- Images
- Infographics
- Videos
- Sound effects
- Music
And more.
Click the “Media” button on the right sidebar to access the Media Board. You can use free music, sounds, and video clips from Riverside’s library or add your own media files (up to 100 MB) by clicking the plus “+” button.

Whenever you want to play or show media add-ons during the webinar, click on the one you want to play, then select “Live” from the bottom right corner to show it to your audience.

With Riverside’s Business plan, you can also share slides and presentations you’ve prepared in advance.
Click the “Share” button at the bottom, then select “Presentation.” You can upload your PDF and PowerPoint files by clicking the plus “+” button and opening them during your livestream.

You can advance the slides yourself or give control to another webinar participant.
To assign this task to someone else, click the plus “+” button at the top right of the presentation and select “Give control.”

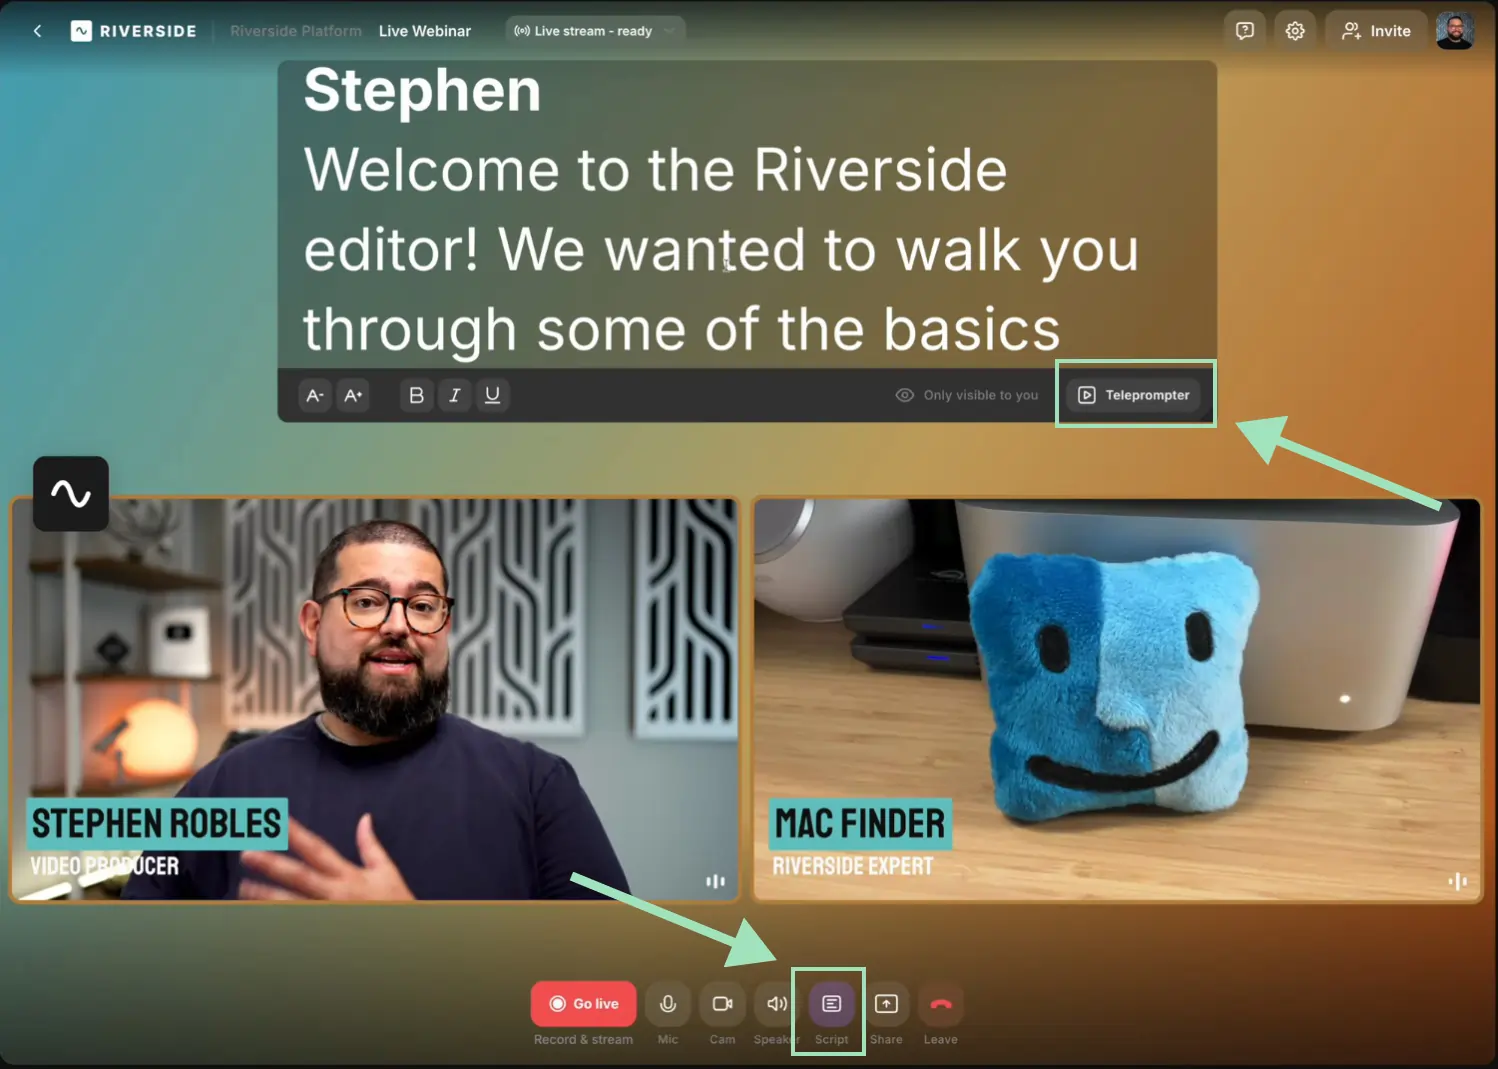
Step 5: Add a webinar script
If you’re using a script to help guide you during the webinar, you can upload it to Riverside’s teleprompter so that the script appears on your screen while you’re presenting.
Click the “Script” button at the bottom to open the script window. Type or paste the script, then click the “Teleprompter” button to have Riverside scroll the script automatically.
Step 6: Set up livestreaming options
Here’s where things get really exciting.
You can use Riverside to livestream your webinar on social media. This means you can expand your webinar’s reach way beyond the registered attendees.
With livestreaming, your webinar can reach up to 10,000 attendees via popular livestreaming platforms like Twitch, YouTube, TikTok, and even your custom RTMP destinations.
To set up livestreaming, click the “Live stream” button at the top and ensure the “Public audience link” toggle is turned on.
Click on the platform you want to activate, log in with your account, and your livestream will be shared there automatically. You can turn platforms on and off anytime and even stream on multiple platforms simultaneously.

With the “Custom RTMP” option, you can also set up your livestream to be broadcast on Instagram. You can also schedule your event on YouTube. Just go to your YouTube Studio, create a scheduled event, copy your Stream key and Stream URL, then paste them on Riverside.

Hosting your live webinar
So far, you’ve sent out webinar invitations, written your script, branded your studio, had a few practice runs with your producer and guests, and your slideshows are locked and loaded.
Only one thing left to do: Run this webinar.
Step 1: Start hosting your live webinar
Once you’re ready to get started, click the red “Go live” button at the bottom, then select “Record.”
Once the countdown is over, your webinar is live.

You can monitor the number of people following you on each platform by clicking the “Live rec” button at the top.

Step 2: Choose speaker layouts
In addition to the features you’ve already set up (branding, teleprompter, shareable media files, lower thirds), you can now use a few more very cool features while running the live webinar.
On Riverside, you can choose who is showing on screen at all times. And where they are positioned on the screen.
You can hide yourself or your guests while you share your screen, a video, or a presentation. Or you can change the layout to highlight someone, such as a keynote speaker.
Click the “People” button from the right sidebar to access all guests. You can choose who is shown on the screen or hide them by clicking “Hide.” (Note that anyone you hide won’t be recorded.)
If you want to change your guests’ layouts, click the “Layout” button in the right sidebar. You can show every participant evenly in a grid, fit everyone’s screen to the frame, or let Riverside automatically focus on who’s speaking.
You can switch between layouts quickly during the webinar using keyboard shortcuts.

You can also drag and drop anyone’s video to reposition it by clicking on the drag handle menu at the top of their screen or pinning the screen into position by clicking the pin button.

Step 3: Share your screen
Of course, you can share your screen live.
Just like your video and audio, your screen share is also saved on a separate track, ensuring your presentations look amazing.
Click the “Share” button at the bottom, then select “Screen.” You can share your whole screen, just one window, or even a single browser tab.

Step 4: Engage with your live audience
Now, let’s talk about audience engagement. Riverside provides a built-in chat to encourage audience participation throughout your session.
The OmniChat feature makes it easy to follow the chat, respond to feedback, and answer questions on the go.
You can even invite your audience to participate in the recording through a live call-in!
Click on the “Chat” button on the right sidebar. Here, you will find the internal studio chat, where you can talk with your guests and producers, and the OmniChat.
Select “Live stream chat” to access the OmniChat. You’ll now be able to see every message that’s sent to you and even see the platform from which it came, listed just below the message.

If you type a reply to any message, the answers will be visible on the respective platforms.
You can also add these messages as lower thirds to ensure everyone watching can see them. If you hover over the message, the “Show on stream” button will appear. If you click on it, the message will appear during your livestream as a lower third.
Once again, you can set the timer to determine how long each message should stay on the screen.

Your audience members can also call in live to join the conversation by clicking the blue “Request live call-in” button at the bottom. They can also type the question they want to ask you to give you an idea of what they’d like to discuss.

When someone requests a call-in, a pop-up will appear at the bottom left corner of your screen. Click on the green checkmark to accept it or the red X button to reject it.
You can also see a list of guests asking to join the live chat in the upper right corner.

Once the call is over, click the “People” button in the sidebar, expand the menu, and click “Remove” to end the call.

Step 5: Wrap up your webinar recording
When you’re ready to wrap up the webinar, using lower thirds to add calls to action is a good tactic to use.
Remember, lower thirds can be links, making them ideal for getting your attendees to take action, like subscribing to your email list, downloading a resource, following you on social media, and more.
Once you’ve said your goodbyes and are ready to end the webinar, click the “Leave” button at the bottom and select “End session for all.”

With Riverside, you don’t have to worry about how your webinar came out. The results will always be pristine, as Riverside records in high-quality 4K video resolution and 48kHz audio every time.
Every participant is recorded locally, which means everything is recorded directly on their respective devices instead of relying on their internet connection. This ensures that poor internet connections never interfere with the recording quality.
You’ll also be able to download each audio and video track separately for you and every guest, making editing this content an absolute breeze.
Repurposing your webinar with Riverside
Now your webinar is over, it's time to shine. (Oh, the paradox.)
This is another area where Riverside is different from other webinar platforms. On Riverside, the end of a webinar is just the beginning of a seamless promotion process. It’s the perfect tool for repurposing your webinar, something every brand should do to make the most out of their webinars.
Asked about the benefits of repurposing content by Referral Rock, 31% of marketers said that these efforts help increase engagement with their content. More than 20% said repurposing helps increase brand awareness, and 15% said it helped increase website traffic.
According to a recent Contrast survey, B2B marketers get an average of 3-4 new pieces of content from each webinar. They also found that AI-power repurposing tools (like the ones Riverside boasts) save marketers 4-10 hours per webinar.
The fast and fun repurposing process starts with our robust, AI-powered video editor. Let’s say you want to turn your webinar into a podcast or a YouTube video. With Riverside, post-production is a breeze.
Step 1: Open your recorded webinar in the video editor
You can trust our fully automated episode editor to let Riverside put it all together. All it takes is one click, and AI will do the rest.
Return to your Project page, scroll down, and click the purple “Generate” button under “Full Episode.”

This is a great place to start polishing your long-form webinar video.
Step 2: Edit your webinar with AI-powered tools
AI automatically generates a complete transcription of your recording. This allows you to edit your webinar with our text-based editor. With the text-based editor, any text you delete removes the matching video and audio from your recording.

You can also use the cleaned-up transcription to create content such as blog posts and social media posts.
With Riverside’s “AI Producer” tools, you can automatically clean up your audio and remove unwanted silences, background noise, and filler words.
The “Tracks” menu also allows you to edit audio tracks, adjust their volume, or silence them.

No matter how you recorded the webinar, you can edit your layout afterward. Riverside will display your guests side by side by default. If you activate our Smart scenes feature, the video layout will automatically change to focus only on the active speaker.
Open the “Layout” menu in the right sidebar, then activate the “Smart scenes” option. You can also choose other layouts like grid, picture-in-picture, split screen, and more.

Step 3: Caption your webinar automatically
You can even add dynamic captions to your video. Using AI captions enhances accessibility, broadens your audience reach, and ensures that participants with hearing impairments or language barriers can fully engage with the content.
And since you can edit your transcript easily, your captions will always be spot-on.
Remember the overlays that you added before the webinar? You can use them or add new media files to use in post-production as well.

Step 4: Download your perfectly-editing webinar in studio quality
Once you’re done, you can download the transcript, subtitles, and even chapter markers and use them to create tons of new content. Like blog posts, social media posts, YouTube videos, and so much more.

You can also download the raw, uncompressed video and audio files, as well as any screen shares and media you uploaded during the recording, by clicking on “Recording files.”

Generate show notes automatically: AI Show Notes is another feature that can help you easily create written content from your webinars. It automatically generates keywords that you can use to boost your searchability on search engines, as well as a summary, key takeaways, and time-stamped chapter markers of your recording.

Once your webinar has been edited to perfection, you can export the video in high-quality, up to 4K resolution.
If you want to turn it into an audio podcast, download the webinar as a high-quality MP3 file.
Click the purple “Export” button at the top right corner of the screen. Then, choose the video and audio quality and remove Riverside’s watermark. Before exporting, you can also normalize audio levels and remove background noise.
Finally, click on “Export video” or “Export audio.”

All you need to do now is wait for Riverside to create the files before you can download them from your Exports page.
Once your content is ready, Riverside will automatically send you an email, so you don’t even have to worry about checking its progress!
Step 5: Instantly create viral social media clips from your webinar
But wait, we’re not done. Riverside’s AI-powered Magic Clips feature is yet another game-changer.
It generates short clips from your webinar highlights with just one click. You can easily share these highlights on social media over a period of time, reaching a larger audience and keeping it engaged.
Here’s how:
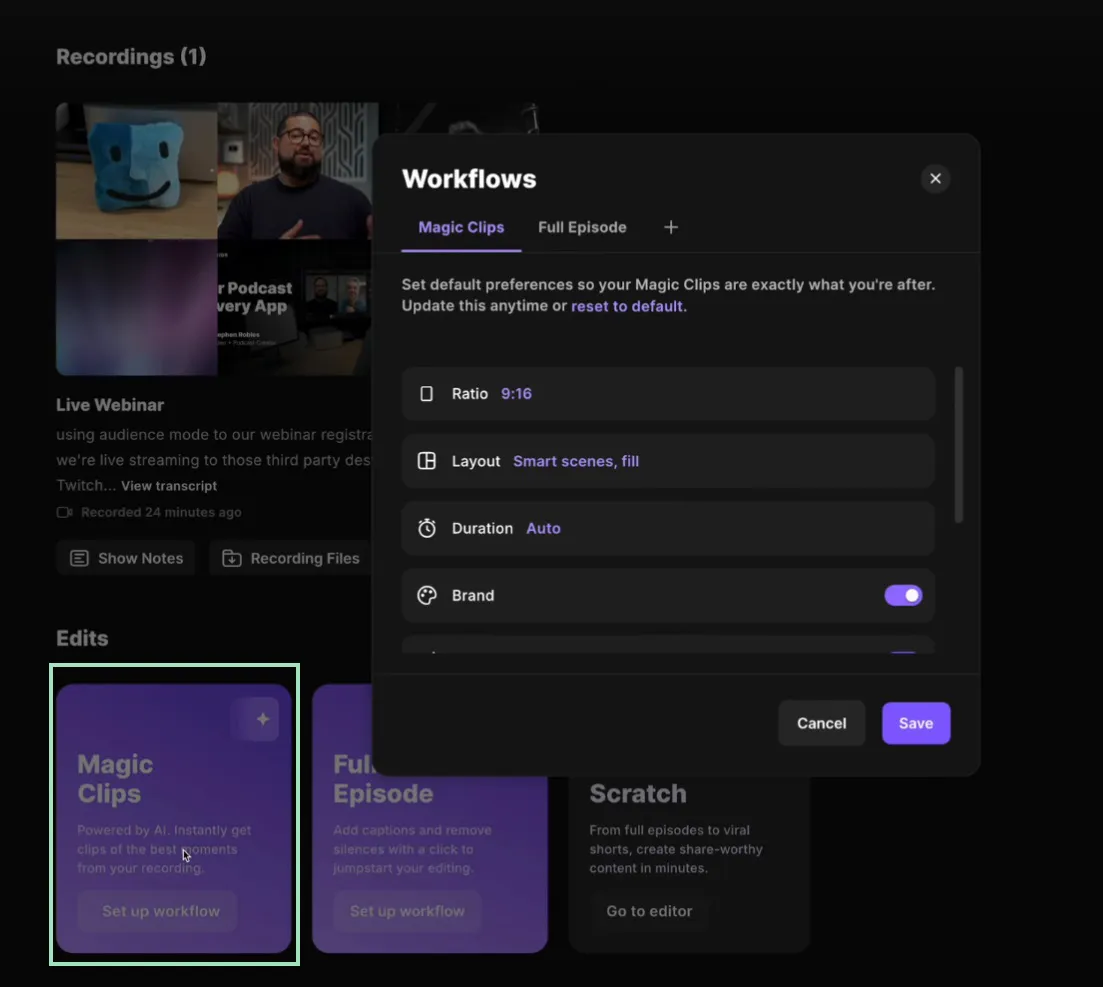
Return to your Project page, scroll down, and click the purple “Set up your workflow” button under “Magic Clips.”
This will open a menu where you can select your default preferences, which will be applied to any future clips you generate. Here, you can choose the screen ratio, layout, duration of the clip, and many other options.
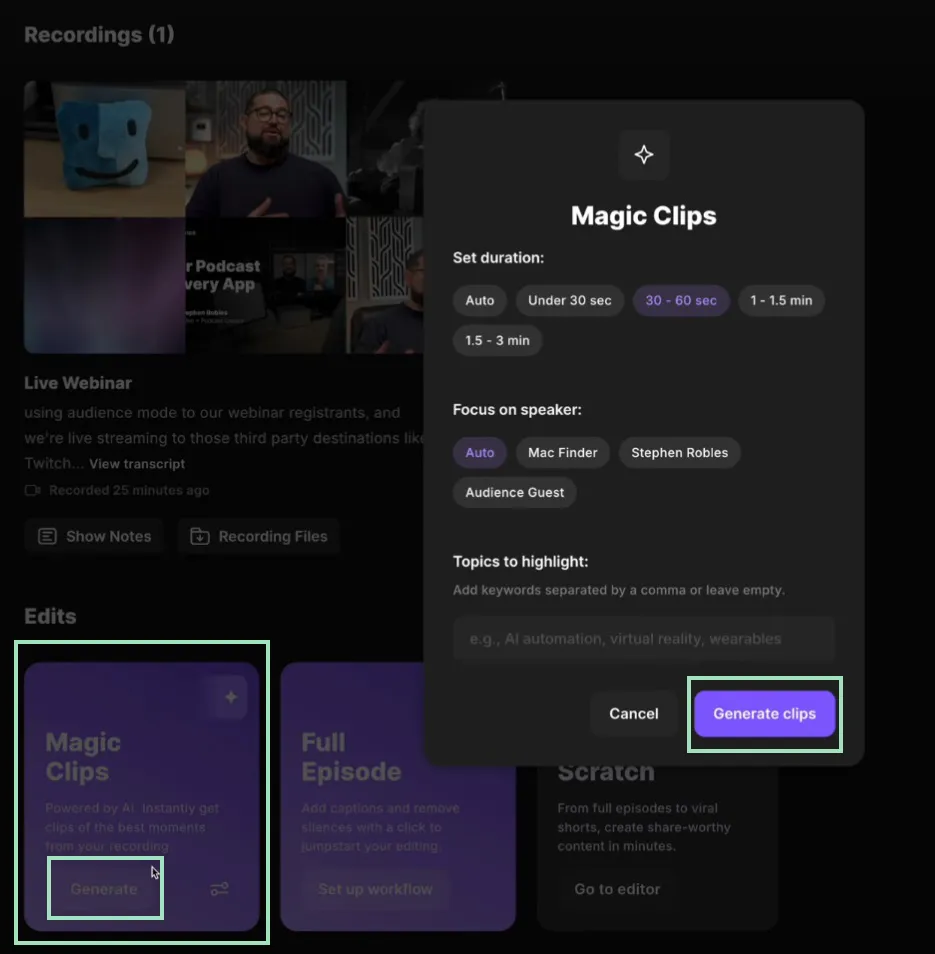
After saving your settings, click “Generate” under Magic Clips, and choose the speaker you want to focus on, the duration of the clip, and the topic you want to highlight by giving Magic Clips a keyword to guide its process.
Click on “Generate clips” to automatically turn the best moments of your webinar into shareable social media content. Magic Clips analyzes your video, finds the best moments, and creates shareable clips for you in seconds!
Of course, you can edit the generated clips further.
In mere minutes, you can perfectly edit social media clips with captions, music, logos—the whole shebang.
Making webinars that drive business: Tips that actually work
Riverside handles the technical side of creating a webinar with ease, but the magic that makes your event truly unforgettable? That’s all you.
Here are some tried-and-true tips that can take your webinar program from zero to 60 before you know it.
Bring in the heavy hitters
Inviting influencers or experts as guest speakers makes webinars more appealing to bigger audiences, thanks to the insane value they add. They can also share with their followers on social media and bring them along for the ride–meaning you can attract a ready-made audience instead of having to build one from scratch.
Keep them engaged
Interactive elements make all the difference. According to an ON24 report, nearly 7 in 10 webinars include downloadable resources to keep attendees involved.
Incorporating things like downloadable resources, surveys, and polls helps create meaningful two-way interactions, keeping your audience active, invested, and more likely to connect with your message.
People love stories
Stories sell. They stick. They matter. People love it when it becomes personal, actual, real. Use case studies, authentic experiences, or “this actually happened” moments. You can bet they'll remember it long after your webinar ends.
Close the bandwidth vampires
Tired of your internet connection failing at the worst moment possible? Close those bandwidth-hungry apps before you go live (looking at you, Dropbox and Google Drive).
And those resource-hogging editing tools like Adobe Premiere? Show them the door. Your stream will thank you.
A webinar isn’t over when it’s over
Once the curtain falls, there’s still so much to do. Think of the next 24 hours as your golden window to nurture your leads into actual clients. Hit everyone's inbox with a killer follow-up: a thank-you note, a recording link, clear next steps, and a chance to give feedback.
And for the no-shows? A "here's what you missed" message that'll make them kick themselves (and sign up for your next one).
Let it go, let it go
Absolutely, prep like your life depends on it, but when the webinar starts, take a moment, breathe, trust your instincts, and let the magic unfold. It may seem like common sense, but honestly, this little tip is a game-changer.
We have a full, step-by-step guide with everything you need to know about how to create a webinar no matter which platform you use.
Transform your webinar experience with Riverside
Riverside will transform the way you think about webinars. From planning and branding to hosting, editing, and repurposing, our webinar software is built to save you time, elevate the quality of your content, and help you share it with the world.
Ready to create webinars that drive real business results? Sign up now and see for yourself.
FAQs for creating webinars with Riverside
How can Riverside simplify webinar creation?
Riverside is an all-in-one platform that streamlines the process of planning, hosting, recording, editing, and repurposing webinars, eliminating the need for multiple tools.
How can Riverside help with webinar scheduling and invitations?
Riverside allows users to schedule webinars from the dashboard. Invitations can be sent to guests, producers, and audience members with customizable registration forms to capture attendee information.
What branding options does Riverside offer for webinars?
Riverside enables users to customize their webinar studio with logos, brand colors, fonts, and themes. These branding features ensure the webinar aligns with your company’s identity.
Can I include interactive elements in my webinars on Riverside?
Yes, Riverside supports adding interactive features such as polls, surveys, and live chats to engage your audience. The platform also allows live audience call-ins to make sessions more dynamic.
How does Riverside handle recording and post-production?
Riverside records all webinar participants locally in 4K video and 48kHz audio to ensure top quality. It offers an AI-powered video editor for seamless post-production, including transcription-based editing, captioning, and layout customization.
Can webinars hosted on Riverside be repurposed into other content formats?
Absolutely. Riverside's robust post-production tools, including Magic Clips for creating highlight reels, can edit webinars into podcasts, blog posts, social media clips, or YouTube videos.
Does Riverside support live-streaming webinars on social media?
Riverside allows users to livestream webinars to platforms like YouTube, Twitch, TikTok, and custom RTMP destinations. This feature helps reach a broader audience beyond registered attendees.
What tools does Riverside offer for audience management and data integration?
Riverside provides tools for attendee registration, data collection, and integration with marketing automation platforms like HubSpot. Users can sync attendee information and custom fields directly into their workflows.
What media options can I use during a webinar on Riverside?
You can enhance webinars by adding slide decks, images, videos, music, sound effects, and infographics. Media files can be preloaded and easily managed during live sessions.


